Monday, May 27, 2013

Haleighanna's Hands: Mini-Pedestal Tutorial


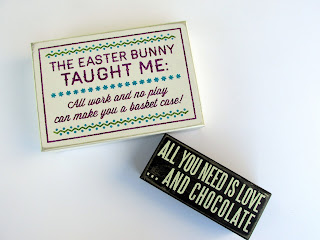
You never know what you will find as you wonder through the world. This mini-pedestal project got its start as I wondered through my local Barnes & Noble. On the super-discount table were these seasonal wood signs covered with glitter and sayings that I had no interest in, but they were really cheap and so they had to go home with me.

They lingered in the studio for a few days before I finally saw their potential: together they could be a mini display pedestal. When I am showing my wares at a craft show, I frequently need small portable display fixtures that have levels. But once I got them done, I thought how lovely they would be on a table, shelf or mantle.

The process is very simple. Here's what you will need...
  • Sandpaper or sanding block medium grit
  • Wood block signs
  • Krylon Fusion Spray Paint
  • E6000 Glue (optional)

Step 1: Sanding

Sand. Then sand. Then sand some more. I had to use a lot of elbow grease to get the glitter, glue and painted words off.


Step 2: Paint

I chose Krylon Fusion spray paint in black satin. Since the wood seemed to be covered with a plastic coating, I used Fusion just to be safe. Do this in a well ventilated space. Be patient because it will take a few coats.


Step 3: Glue

You can use your trusty E6000 to glue the pieces together. This is an optional step. I chose not to glue them because I may want to use just one or two pieces at a time.


Wood signs might not be easy to come by so while I did not try this, I think wooden cigar boxes would work as well. I would suggest gluing the lid shut and removing any hardware that would scratch your surfaces.

What fabulous and cheap finds have you found recently and then turned into something fabulous?

Monday, May 20, 2013

Haleighanna's Hands: Tools that I Can't Live Without

Every crafter and artist has their favorite tools. For some it's paper, or that beloved die-cutting system or rubber stamps. Below are my eight "I've-got-to-have-them-or-I'm-not-sure-I-can-go-on" supplies. The list is in no particular order.

The Glues

Want to glue wood? Metal? Glass? Then E-6000 is absolutely the answer. I have used it to glue organic material to wood, metal to canvas, and well, the list is just too long. It will do just about anything you need it to do. (Note: This is not a glue for kids and you should use it in a well-ventilated space).

Is there anything that I can tell you about Mod Podge that you don't know? I use it whenever I am decoupaging. It adheres so well and adds a great seal. I apply coat after coat and it gives my work a varnish feel. Usually I use the Matte finish.

Liquidex Matte Medium Gel can be used as an adhesive, but I must admit that I use it more for photo transfers. It dries clear and creates a skin that grabs laser toner and won't let go. It can show brush strokes so it requires a light touch, but it's the only way that I have gotten photos to transfer.

The Cutting Tools

Fiskars, how do I love thee? Let me count the ways. My paper trimmer (which is no longer available) has a swing arm and has been with me through thick and thin. For more precise work, I use the Fiskars Micro-Tip scissors. I am not as adept with a utility knife as I would like to be; the Micro-Tip scissors help me get into tight corners.

When I first started scrapbooking, I grabbed the Making Memories eyelet setting kit and since then we have had a long and fruitful relationship. Punch, setter, tweezers and so much more. It's portable and I love that everything has a place in the tin. I have had it for years and the punch bits are still sharp.

Acrylic and the Acrylic Gobbler

I use a lot of acrylic paint in my work. I like Folk Art from Plaid because it does give you artist quality paints at an affordable price. Lots of colors to choose from.

Then, where would I be without rubbing alcohol? It gobbles the acrylic paint and provides some tremendous effects. I poor it into a spray bottle, spray it onto my work, and then remove it and the paint with paper towels. (Note: Again ventilation is key for this technique and I would use this technique sparingly on paper alone. The whole process gets pretty wet and will warp paper if it is not adhered to a stronger substrate.)

That's my list. What tools or product can you just not live without?

Monday, May 13, 2013

From "As Is" to Studio Worthy!


I do love a bargain. Wandering around a craft store, I found a Washi tape dispenser. It was severely marked down with the a warning, "As is." Seeing nothing wrong with it, I decided to grab it. It made the journey to the studio and then sat there. I got a super bargain but now what? White, after all, is my least favorite color. Time for a re-do!
Marked down from $15.00 to $3.50!

I gathered:
  • Two pieces of 12 x 12 scrapbooking papers
  • Krylon Fushion spray paint
  • E6000
  • Balsa wood
  • Spray adhesive
  • Embellishments
  • Ranger paint dabbers
  • Masking tape
  • Craft knife
  • Ruler
The top horizontal line is the top of the dispenser.

I wanted to change the shape of the dispenser and personalize it so I bought a piece of Balsa wood. I measured the width of the dispenser and cut the balsa wood to fit. I then laid the dispenser on the Balsa wood and drew a line so show the top so I could see the real estate I had above the dispenser. I found the middle of the piece of wood and drew curves on the balsa wood so that my finished piece would have a cathedral feel. Using the craft knife I cut the curves.


Spray painting was next. I chose Krylon Fusion spray paint in black satin. Since the dispenser had a laminate coating, thought this would adhere best. Plus it dries super fast. I wanted bits of the black to show through around the edges of the paper. You could skip this step if you'd like.

I used masking tape to cover the cutting teeth to keep them sharp.

The spray painting turned out so well, that you might just want to stop here and embellish. I had already picked out scrapbooking pages that I loved so I just pushed on.
 

Using spray adhesive, I glued the paper to the balsa wood and cut off the excess. I repeated the process so that I had paper on both sides. Then I sanded it a bit.

Using the dispenser as a guide, I traced around the outside of both curved corners on the scrapbooking paper. I cut them out and using E6000 and glued the paper to the dispenser. Then I measured all of the other areas including the back wall of the dispenser. I then cut those pieces out of the paper and glued them with E6000 until I had all the white areas covered. (Remember to hold the paper in place for a bit. This glue needs time to set.)

I had some laser cut pieces and used a scrap of paper and glued it to them. Using a craft knife, I cut around the edges.
I used Ranger Paint Dabbers in Black to add a little contrast.

The back and embellishments were glued and I put books over them and let dry until the next day.

Then, just add your tape!


Monday, May 6, 2013

Haleighanna's Hands: SXSW and the Journaling Experience

In March, I attended the South by Southwest conference. I went to support my company but I also got the opportunity to support my own creativity.
I attended a session called, “Creativity—From a Pile of Rocks to a Work of Art” given by Josh Gosfield, a fine artist, author and award winning illustrator, photographer and art director. One of the most impactful points he made (and I am paraphrasing here) was about how to go about getting inspiration, “Keep an idea journal. Turn off screens! Daydream! Ask yourself 'what if?"
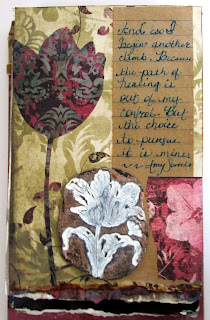
I couldn't agree more. For years, I have kept journals. Sometimes I use them to dream. Sometimes I use them to try a new technique. Sometimes I use them to process my world and experiences--the good memories and the bad, the unusual and the typical, the joyful and the painful. Below are just a few of my pages. 

I also used bits of paper from a sack from a popular store.
Loved the quote and used some scraps I had lying around.
 
 The medallion in the middle was a piece of polymer clay that I had rubber stamped into. It didn't make it into the intended piece, but it worked great here.
 
This was my second attempt at trying to express some of the regrets of my life. Sometimes once is just not enough.
 
The brown pieces were used as packing peanuts and I painted them. I like how they give a "prison" feel to the page.

A page to commemorate a walk on the beach with my husband.

Journaling can be used to mark the passage of your life or help you work out issues or experiences. What other ways do you use journaling? What has it taught you?