Monday, October 29, 2012

Guest Blogger: Maddie of Thirftary.Blogspot.com

I subscribe to the Thirftary blog. I love it. Maddie is gracious and has some very cool ideas.  I wanted to share one of them with you today. Let's Get Scrappy is a post from October 22, 2012.

A special note of thanks to Maddie for letting me share this. I have shared the beginning of her post and a link if you'd like to finish reading it.

 
Oh boy oh boy. Do I have a treat for you today! Here is some info that you DIYers are going to want to know, if you haven't already made this discovery.

I have this really cool friend who is in the interior design industry. This really cool friend called me the other day and told me that there was an event that I need to go to with her, called Zero Landfill. This program was created to divert design and architectural materials from landfills. So instead of trashing it all, they put it out at these events for the every-day DIYer to pick up FOR FREE. That's right. For free. I am now following the Denver chapter on Facebook. If you are from another area, please hop on Facebook and find the nearest Zero Landfill chapter near you!


Monday, October 22, 2012

The Old Me Meets the Current Me

When I was 13, back in the far off land of 1976 – the Bicentennial year complete with the nightly “Bicentennial Moment” - I got a Holly Hobbie calendar. I loved it. Not only was it pretty, but it used my name and back then there were so few things that used my name. In fact, I could go years without meeting another Holly.

But, the calendar ran its course.  I was bored so I got my calendar out. I remember meticulously and patiently cutting my little Holly Hobbie figure out with scissors. I also remember gluing her to a piece of muslin, applying layer after layer of glue. I put so much glue on it, that it looked like varnish and Holly was "floating" in it.

Somehow, I managed to keep this little piece of material. I have lost my first drafts of a number of short stories, my signed letter from Jimmy Carter, and even a lot of childhood photos. But, this little piece of material with the decoupaged Holly Hobbie, has managed to survive moves and neglect.

A couple of years ago, I was cleaning out the basement and I opened a box and there was the original calendar and in the calendar, was my decoupaged Holly Hobby. It was like finding a bit of me again. At that point in my life, I just began to play around with mixed media so I decided to build a piece around it.
Now something you need to know about me - I hate to make mistakes. I mean I hate it, especially when there is no way to repair what I have done wrong. I don't think I am different from a lot of people. None of us want to do something and find out that we shouldn't have done it. It was frightening to take this almost sacred item from my childhood and put it onto a canvas, but I am glad I did.

It was magical for the 13 year old Holly to meet the 40 year old Holly.

Wednesday, October 17, 2012

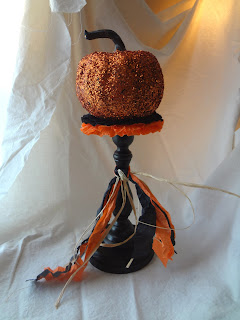
Glitter Pumpkin Tutorial

This project is pretty cheap and perfect for this time of year. The materials needed are:

What you will need:
  • Foam pumpkin (Dollar store or craft store)
  • Unfinished wooden candlestick
  • Unfinished wooden (thin) disc
  • Tissue paper (Consider using a tissue paper the same color as paint and glitter)
  • Glue (white)
  • E6000 adhesive
  • Paint
  • Small wood disc with a beveled edge
  • Crepe paper (orange and black)
  • Foam brush
  • Needle and thread
  • Plastic wrap or aluminum foil

Step one

Remove the metal candleholder from the candlestick (if it comes with one). If you can’t remove it, push it inward with pliers. Sand all the wood pieces lightly—you want to remove any wood bits or splinters.

Step two

Using the E6000, put the glue account the base of the candlestick (on the bottom) and center it on the small wood disc with the beveled edge. Again using the E6000, put glue on the top of the candlestick and place the small, thin disc on top of the glue, centering it in the think disc. Set it aside and come back to it tomorrow.

Step three

Tear the tissue paper into strips and decoupage the tissue paper on the foam pumpkin. The tissue paper will give the pumpkin a wrinkled look. Set it aside and let dry.

Step four

Take the crepe paper and put the two colors together. Using the needle and thread, baste the center of the crepe paper. This will make it easy for you to gather the crepe paper. Baste enough for you to glue to the outer edge of the thin disc (around 50 inches so that there is a little overlap).

Step five

Paint the wood your desired color. Apply as many coats of paint until you are satisfied with the look

Step six

Paint the pumpkin your desired color. To avoid any color showing through the glitter, it is best to paint the pumpkin the same color as the glitter. If you want the pumpkin color to show through gaps in the glitter, paint it another color.

Step seven

Apply glue to the painted pumpkin and glitter away. Let it dry. (Once it is dry, if you find gaps in your glittering, just put some glue on the gap and reapply some glitter and let dry.

Step eight

 
Gather the crepe paper until it looks like a ruffle. Folding the crepe paper in half and finger press. Draw a ring of E6000 glue around the outer edge of the thin disc. Take the gathered crepe paper and put the folded edge into the glue. Place the candlestick upside down on the wrap or foil and place something a little heavy on the base (I used a large acrylic paint bottle.) Let dry.


Step Nine

Using the E6000, glue the bottom of the pumpkin and place it on the crepe paper/thin disc combo. Let dry.

Sunday, October 14, 2012

Persistence in Spite of Cottage Cheese


If you’re like me, there are a couple of things that you’re always attracted to—colors, shapes, quotes, etc. No matter where you see them, they always catch your attention. For me, one of them is pumpkins.

Fall is my favorite time of the year, but I leave my pumpkins out all the time. So imagine how excited I was when I was in the Michael’s a few days ago and found medium-sized papier mache pumpkins for around $3.00 each. I grabbed two; one I altered for my daughter’s new house and one I did for me—gun metal gray. I wanted another one, but the Michael’s was out. So my brain got going—how was I going to satisfy this hunger for pumpkins?

Make my own.
I gathered my materials (i.e., a Dollar store foam pumpkin) and took pictures. I thought, “Hey, if this works out, I could share it with other people. Do a tutorial, maybe someone picks it up and puts it on Pinterest.” Really cool idea. And of course, I had to do it right away.

I greased up the pumpkin with petroleum jelly so that the paper would release when it was dry. I made the papier mache paste and started applying wet strips of a grocery paper bag to the pumpkin. It was a mess. I mean huge. At one point the pumpkin looked like it was covered in cottage cheese. Yep, it was gross. I tried to gently wipe it down. It looked better but I was still—well--bumpy.

I came back a few hours later and my worst fears came true. It was in the shape of a greasy, gross pumpkin.

Ok. Now what? I thought about rolling up paper to make an armature. That was a bust. Then I thought about tin foil. But I couldn’t get it to stick together to make the armature.

Then it hit me--cover the pumpkin with adhesive tin tape.

I got it to work, but it took a lot of time to get enough layers to make it strong enough to stand on its own. All I can say is that thank God pumpkins are not perfect and frequently bulbous on one side.


The moral of the story is that some things take a LOT of persistence. Even when one is confronted with a cottage cheese like mess (like so many things in life), one must press on.

Monday, October 8, 2012

Out of the Creativity Box


What does it really mean to be creative?
In my faith, we are all made in the image of God. He is the ultimate creator. Light, time, DNA, nature--all sprang from His mind. He is visionary, dynamic, and can create something out of nothing. All of things are out of my reach. I cannot do them. And yet, He created me to be an image bearer.

At work, I am often asked to do little things, like tying a bow with the words, "Can you do this? I am not creative..." trailing behind. What does creativity have to do with tying a bow? Tying a bow is a skill--one I do not possess. But I am creative and so is the person handing me the ribbon.
There is a vast difference between not knowing a skill and not being creative. Skills are learnable; knowledge is obtainable. It takes a teacher, practice, and sometimes, a lot of dedication. But creativity is not something that is learned; it is something that is given. In fact, given who our Father is, it cannot be avoided.

The real issue is that we look at the word, "creative" too narrowly. While we cannot make something out of nothing, we can, and do, take all the things around us and fashion them into something new. We look at situations and figure out new ways to tackle them. We get up each morning and choose an outfit to wear. We comfort a friend or make a child laugh. Some of us do cool things with paint and paper; others do tasty things with food; still others make cars run out of spit and bailing wire. It is not the doing or the skill of the execution that bears on creativity. It is the thought, inspiration, and doing that makes up creativity.

BTW: If you want to learn how to make a bow, go to http://www.bhg.com/christmas/gift-wrapping/festive-bows/

Wednesday, October 3, 2012

Pay it Forward


When I was a little girl, I went to spend the weekend with my great aunt Lorraine. She lived on a farm and being a city girl, I was terribly bored. To keep my little hands busy, she taught me to sew. She gave me a needle, some red thread and two facial tissues and showed me how to make an X in the corner to attach them together. Before I left that weekend, there were a lot of tissues sewn together. Aunt Lorraine had no idea what she had done – the road she had started me down what a special place in my heart she would always hold because of that.
When I was ten, my mother and my aunt taught me to crochet. Once I got the hang of it, I was a granny-square-making machine (keep in mind it has the ‘70s). I had always wanted to knit (seeing it as the Mount Everest of needlework), but my no one in my circle knew how. A few years ago, we hosted a German exchange student, Bea, who was kind enough to teach me to knit Continental (which made more sense to an old crocheter than tossing the yarn). After that I wanted to knit everything. I felt like I had summited the highest peak on earth.

Recently, one of my dear friends was telling me that she saw a great desire in her twelve year old daughter, Emily, to craft things with her hands. Sadly, she has a panic attack every time she drives into the Joann's parking lot. She's a great mom, but craft stores just create an anxiety in her. I adore her daughter and told her that I would be her fairy Craftmother. Soon after, we went on the shopping circuit (I am blessed with a Hobby Lobby, Archiver’s, Michael's, and Joann's in a very tight area) and then we spent a couple of hours in my studio. We talked craft and her curiosity in doing things you don't know how to do -  and the courage it takes in middle school (or in middle age) to stick to who you are. Her mom called me that afternoon to thank me for my time and for "filling up" her Emily's soul.
When I think of the loving hands that showed me how to sew, crochet and knit, I realize that they were crucial to making me who I am today. I really didn't see very much of Aunt Lorraine since she died not long after teaching me to sew. Bea went back to Germany and has started her own adult life. But they have an extraordinary place in my heart. Their hands taught my hands. Now, my hands are teaching Emily's hands. Emily's soul wasn't the only one that was filled that day.

Monday, October 1, 2012

Welcome


Welcome to my blog.
My name is Holly Ann (or as in the name of this blog, Ha-leigh-anna). I had a friend in college who once asked me why I didn’t spell my name that way and it stuck.

So I am 49, married for more than half my life and my daughters are grown and gone. I’ve been in the mutual fund industry for 26 years. It’s been a great career, but one day, as I was getting really worked up about some silly breach of protocol, I had a moment of clarity. Clarity as in seeing myself from a different perspective and wondered what that silly middle-aged woman was getting so upset about. It’s not as if someone was sick, or dying or going to jail.
The cliché middle-aged crisis ensued and I had to wonder what the next stage of my life would be.

I decided to start my own company, Haleighanna’s Hands and a blog to go with it. In fact, it opened today! I am a Midwestern girl who loves to do things with her hands. I love to build or transform items that people use to make their lives a prettier place or just makes them happy. So I decided to start a company where I do just that. Make stuff—journals, home décor, memory boxes, or other cool items—and sell it on the open market. No, I haven’t given up my “day job” and periodically I still have tedious arguments (as in raised voices) over whether a semi-colon or a comma is correct. But one can dream.
I am glad you stopped by. I hope that you and I can learn together, talk together, and maybe laugh together occasionally.

Visit my store at http://www.etsy.com/shop/HaleighannasHands